Offload技术初探
小白也想玩转内存与带宽。
本文很大程度上参考PyTorch Tutorial:https://docs.pytorch.org/tutorials/intermediate/pinmem_nonblock.html 以及 https://developer.nvidia.com/blog/how-overlap-data-transfers-cuda-cc/
在大模型推理过程中,有很多内存换计算的技术,如LLM的KVCache、Diffusion的Feature Cache等,然而GPU的显存往往是不够的,我们会希望借助更充足的CPU内存进行“扩容”,这就是offload技术——前提是offload的开销(主要为数据搬移)小于直接计算开销。
将数据在CPU和GPU之间传输是非常基本的PyTorch操作,我们需要掌握如何高效地进行传输。
通过本文你将学习到:
- CPU上普通内存和锁页内存对数据传输效率的影响。
- PyTorch提供的to()和pin_memory()方法对数据传输效率的影响。
- 如何高效而正确地进行异步数据传输。
- 高效offload:通过双流流水线实现存、算、取的重叠。
背景知识
CPU 虚拟内存管理
一个CPU Tensor被创建的时候,它会被放置于CPU内存中,此处的“内存”仍然是一个复杂的概念。内存管理单元(MMU)会处理两种内存类型:物理内存(RAM)和磁盘(Disk)上的交换空间,前者是切切实实的CPU内存,后者则可能是或者不是硬盘空间,二者共同构成了CPU上的虚拟内存,作为可用储存资源的抽象。总而言之,虚拟内存的技术借用硬盘使得CPU的可用空间大于RAM上的可用空间,造成一种可用内存远大于主内存的假象。
一般情况下,一个CPU Tensor是可分页的(Pageable):它会被分块(页面)处理,并储存在虚拟内存中的任意位置,就像图1中tensor被切为多份,一些在disk中,一些在ram中。数据在储存和提取过程中,这些分页和储存位置的细节由操作系统完成,对用户隐藏的。在用户看来,他就是往一块“大”内存中存入或拿出了一个“连续”的大张量(事实上可能ram中根本没有足够大的连续空间存下这个张量)。
当程序访问不再RAM中的页面时,会发生“缺页错误”,此时操作系统会将Disk中的页面换入RAM中,反之,也可能有另一个页面被换出,从而腾出空间。
与可分页内存不同的是,RAM中还存在锁页内存(pinned memory),这是一种无法被换出到磁盘的内存,允许更快、更可预测的访问时间,代价是内存大小和灵活性受到限制。

图1: CPU内存架构和CUDA数据搬移
CUDA 数据搬移
当CUDA尝试从CPU搬移(copy)一个Tensor时,就会遇到以下两种场景:
- 如果内存被分页锁定(paged-locked),也就是完全储存在锁页内存中,那么GPU就可以直接从RAM访问数据,有明确的内存地址,读取速度很快。
- 如果内存是可分页的(pageable),所有页面就需要先转移到RAM,再发送到GPU,这会需要更多时间,而且由于不清楚有多少页面存在Disk中,读取速度可预测性较差。
更加精确地说,GPU与磁盘不直接相连,CUDA将可分页数据从CPU发送到GPU时,必须先创建数据的pinned memory副本,再进行传输。
数据搬移的异步和同步操作
CUDA toolkit 提供了相对于host同步或者异步的数据搬移方法。在PyTorch中比较常见的是.to(),此时始终会调用cudaMemcpyAsync,如果设置参数non_blocking=False(默认),则每次cudaMemcpuAsync调用后会调用cudaStreamSynchronize,使得to()的调用在阻塞主线程。如果设置non_blocking=True,则不会触发同步,主线程不会被阻塞,在host看来,可以同时发送多个数据到device,因为不同的传输之间不会阻塞。
在device端看来,传输操作通常是阻塞的,在执行其他操作的时候,copy操作就是无法进行。但是,在满足某些条件的情况下,copy和kernel execution是可以在GPU端同时进行的。这很重要,因为这意味着无依赖数据的prefetch和overlap,要实现这一点,必须满足以下三个要求:
- 设备必须至少有一个可用的DMA Engine(Direct Memory Access Engine,直接内存访问引擎)。现代GPU,从Volta架构开始都拥有并不断增强DMA引擎的能力。 DMA引擎使得GPU不需要CPU的介入就可以直接访问主内存,带来了异步操作的可能性。
- 传输必须在单独的非默认CUDA流上进行。
- 源数据必须位于锁页内存中。
附:简易的实验代码
import contextlib
import torch
from torch.cuda import Stream

s = Stream()

torch.manual_seed(42)
t1_cpu_pinned = torch.randn(1024**2 * 5, pin_memory=True)
t2_cpu_paged = torch.randn(1024**2 * 5, pin_memory=False)
t3_cuda = torch.randn(1024**2 * 5, device="cuda:0")

assert torch.cuda.is_available()
device = torch.device("cuda", torch.cuda.current_device())


# The function we want to profile
def inner(pinned: bool, streamed: bool):
    with torch.cuda.stream(s) if streamed else contextlib.nullcontext():
        if pinned:
            t1_cuda = t1_cpu_pinned.to(device, non_blocking=True)
        else:
            t2_cuda = t2_cpu_paged.to(device, non_blocking=True)
        t_star_cuda_h2d_event = s.record_event()
    # This operation can be executed during the CPU to GPU copy if and only if the tensor is pinned and the copy is
    #  done in the other stream
    t3_cuda_mul = t3_cuda * t3_cuda * t3_cuda # 默认流上执行矩阵乘
    t3_cuda_h2d_event = torch.cuda.current_stream().record_event()
    t_star_cuda_h2d_event.synchronize()
    t3_cuda_h2d_event.synchronize()


# Our profiler: profiles the `inner` function and stores the results in a .json file
def benchmark_with_profiler(
    pinned,
    streamed,
) -> None:
    torch._C._profiler._set_cuda_sync_enabled_val(True)
    wait, warmup, active = 1, 1, 2
    num_steps = wait + warmup + active
    rank = 0
    with torch.profiler.profile(
        activities=[
            torch.profiler.ProfilerActivity.CPU,
            torch.profiler.ProfilerActivity.CUDA,
        ],
        schedule=torch.profiler.schedule(
            wait=wait, warmup=warmup, active=active, repeat=1, skip_first=1
        ),
    ) as prof:
        for step_idx in range(1, num_steps + 1):
            inner(streamed=streamed, pinned=pinned)
            if rank is None or rank == 0:
                prof.step()
    prof.export_chrome_trace(f"trace_streamed{int(streamed)}_pinned{int(pinned)}.json")

# main
benchmark_with_profiler(pinned=0, streamed=0)
benchmark_with_profiler(pinned=0, streamed=1)
benchmark_with_profiler(pinned=1, streamed=0)
benchmark_with_profiler(pinned=1, streamed=1)
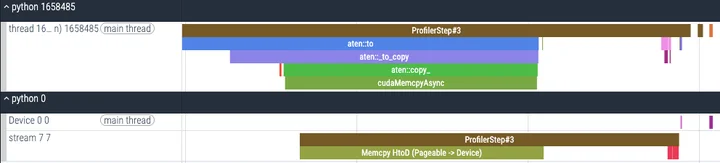
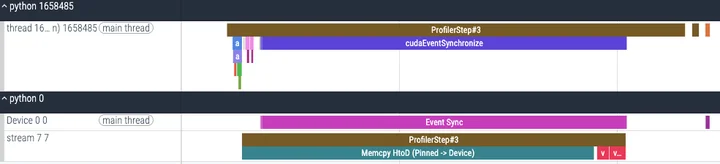
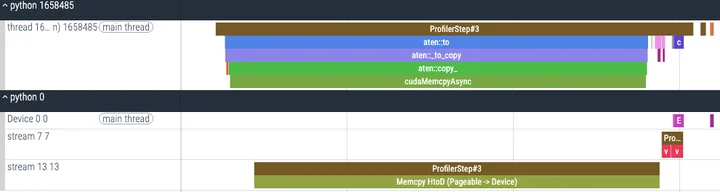
在上面的实验中,在满足条件1的gpu上调用to(non_blocking=True)进行数据搬移,并控制变量,模拟了条件2(非默认流)和条件3(锁页内存)的有无,并观察了执行的trace,我在A800上的实验结果如下:

pin_memory() :转移数据到CPU锁页内存
上面的实验我们观察到,对于pinned memory,进行数据搬移的速度会变快,而且支持multi-stream的overlap操作,如果想要利用这项特性,PyTorch提供了pin_memory()方法,将pageable的数据搬移到锁页内存上。那么,开销是多少呢?
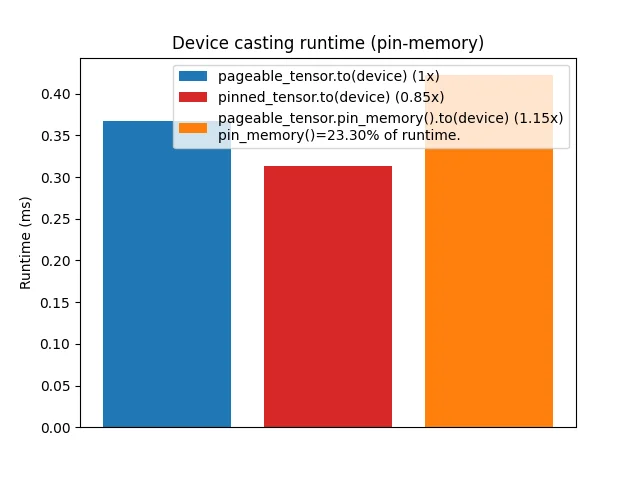
将pinned tensor搬到gpu上会更快,但是现将pageable tensor搬到pinned memory再转移到gpu则往往会导致更高的开销(与硬件和tensor大小有关)。而且pin_memory()本身会导致主线程阻塞。 因此,在申请内存时直接申请锁页内存可能是更好的选择。
non_blocking=True :非阻塞数据传输
这个参数可以使to()等方法相对于host异步执行,也就是不阻塞CPU的主线程。 我们设计实验来观察其影响,对1000个数据进行传输,其中100次进行profile,代码如下:
import torch
import matplotlib.pyplot as plt
import time
import functools
from torch.profiler import profile, ProfilerActivity, record_function

def timer(func):
    @functools.wraps(func)
    def wrapper(*args, **kwargs):
        torch.cuda.synchronize()
        start = time.perf_counter()
        for _ in range(1000):
            result = func(*args, **kwargs)
        torch.cuda.synchronize()
        end = time.perf_counter()
        return (end - start) * 1000 / 1000
    return wrapper

@timer
def copy_to_device(*tensors):
    result = []
    for tensor in tensors:
        result.append(tensor.to("cuda:0"))
    return result

@timer
def copy_to_device_nonblocking(*tensors):
    result = []
    for tensor in tensors:
        result.append(tensor.to("cuda:0", non_blocking=True))
    torch.cuda.synchronize()
    return result

def profile_detailed(tensors):
    print("\nDetailed Profiling Analysis:")
    print("-" * 50)

    # 分析普通复制
    with profile(
        activities=[
            ProfilerActivity.CPU,
            ProfilerActivity.CUDA,
        ],
        record_shapes=True,
        with_stack=True,
    ) as prof:
        with record_function("normal_copy"):
            result = []
            for tensor in tensors[:100]:  # 使用较小的数据集来分析
                result.append(tensor.to("cuda:0"))

    print("\nNormal Copy Analysis:")
    print(prof.key_averages().table(
        sort_by="cuda_time_total",
        row_limit=10
    ))

    # 分析非阻塞复制
    with profile(
        activities=[
            ProfilerActivity.CPU,
            ProfilerActivity.CUDA,
        ],
        record_shapes=True,
        with_stack=True,
    ) as prof:
        with record_function("non_blocking_copy"):
            result = []
            for tensor in tensors[:100]:
                result.append(tensor.to("cuda:0", non_blocking=True))
            torch.cuda.synchronize()

    print("\nNon-blocking Copy Analysis:")
    print(prof.key_averages().table(
        sort_by="cuda_time_total",
        row_limit=10
    ))

def main():
    if not torch.cuda.is_available():
        print("CUDA not available!")
        return

    print("Creating test data...")
    tensors = [torch.randn(1000) for _ in range(1000)]

    # 运行性能分析
    profile_detailed(tensors)

    print("\nRunning timing tests...")
    to_device = copy_to_device(*tensors)
    to_device_nonblocking = copy_to_device_nonblocking(*tensors)

    r1 = to_device_nonblocking / to_device

    print(f"\nTiming Results:")
    print(f"Normal copy time: {to_device:.2f}ms")
    print(f"Non-blocking copy time: {to_device_nonblocking:.2f}ms")
    print(f"Speed ratio: {r1:.2f}x")

    # 绘图
    fig, ax = plt.subplots(figsize=(10, 6))

    xlabels = [0, 1]
    bar_labels = [f"to(device) (1x)", f"to(device, non_blocking=True) ({r1:4.2f}x)"]
    colors = ["tab:blue", "tab:red"]
    values = [to_device, to_device_nonblocking]

    bars = ax.bar(xlabels, values, color=colors)

    for bar in bars:
        height = bar.get_height()
        ax.text(bar.get_x() + bar.get_width()/2., height,
                f'{height:.2f}ms',
                ha='center', va='bottom')

    ax.set_ylabel("Runtime (ms)")
    ax.set_title("Device Casting Runtime Comparison")
    ax.set_xticks(xlabels)
    ax.set_xticklabels(bar_labels)
    plt.xticks(rotation=15)

    plt.tight_layout()
    plt.show()

if __name__ == "__main__":
    main()
画图结果如下:
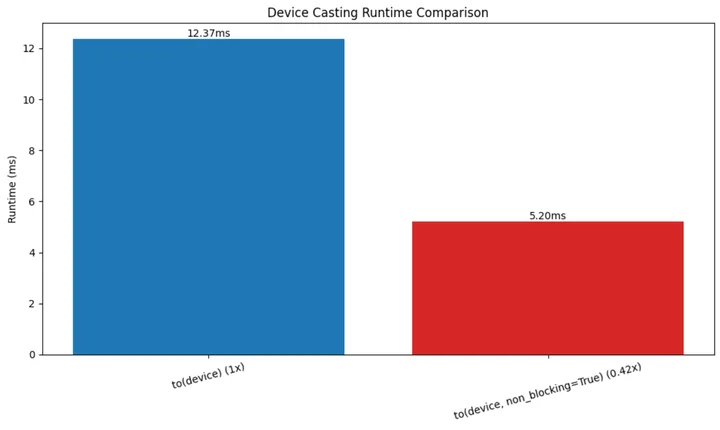
毫无疑问non_blocking+synchronize的效果是更好的。观察breakdown的数据:
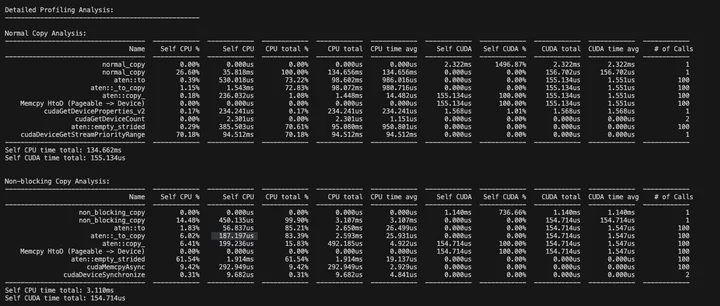
CUDA时间差不多(传输操作本身的开销),但是CPU时间差异巨大(同步的阻塞时间)。
pin_memory()+non_blocking 组合使用
对于不同储存形式的tensor,传输的阻塞与否同样影响性能。
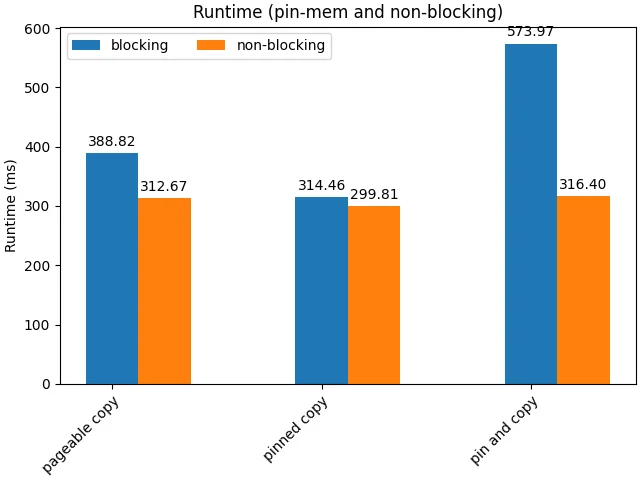
首先,non-blocking几乎总是好的,因为这允许了cpu并发地起任务(包括传输任务和内存转移任务),减小host端的开销。另一方面,注意到pin_memory()+blocking()带来了极差的效果,这是由于串行起任务和memory alloc的开销,以及频繁的synchronize;以及,手动的pin_memory()操作导致主线程阻塞,从而抵消non_blocking的优势。
异步导致的数据冒险
使用non_blocking在主机和设备见进行数据搬移存在着安全问题。
当我们从CPU传数据到GPU时,大多数情况下是比较安全的,特别是当我们使用普通的(可分页的)内存时。这时候即使用了non_blocking=True这样的异步传输,CUDA也会帮我们自动处理好同步,确保GPU读取数据时一切正常。
但是如果我们用了锁页内存(pinned memory),情况就不一样了。假如做了异步传输后马上在CPU端修改原始数据,这些修改可能会导致GPU那边收到损坏的数据。同样的,当我们从GPU传数据回CPU,如果不做明确的同步,我们无法确保数据是正确的。
那怎么办呢?其实解决方案很简单:在大多数普通情况下(从CPU的可分页内存传到CUDA GPU),就放心地用non_blocking=True吧,CUDA会帮我们处理好一切。但如果是其他情况,比如用了锁页内存,或者是从GPU传回CPU,虽然还是可以用non_blocking=True来提高性能,但一定要记得在真正使用数据之前调用torch.cuda.synchronize()来做个同步。这样就能保证数据安全了,不会出现莫名其妙的错误。
总之,使用 non_blocking=True 时将可分页数据从 CPU 复制到 GPU 是安全的,但对于任何其他方向和锁页内存数据,如果使用 non_blocking=True必须确保在访问数据之前执行设备同步。
Device to Host 传输
D2H操作可以通过.cpu()或者.to(‘cpu’)进行,前者更加简单,参数少,内部调用的仍然是.to(‘cpu’),更精细的控制还是使用.to(‘cpu’)。
D2H的数据传输仍然可以借助DMA引擎避开CPU的介入从而避免阻塞,前提是写入的内存是锁页内存。如果是写入默认的虚拟内存,则cuda驱动需要执行较为低效的两步走策略:
- 第一步(真正的D2H):驱动程序在主机端分配一块临时的、页锁定的“中转缓冲区”(Staging Buffer)。DMA引擎将数据从GPU显存高效地传输到这个中转缓冲区。
- 第二步(CPU拷贝):CPU介入,将数据从中转缓冲区拷贝到指定的最终目标(那个可分页的内存地址)。
为了获得较高的传输速度,应当尽量使用锁页内存,但是cuda的tensor没有pin_memory()操作或参数,较好的实践是:
# 1. 在主机端预先分配一个目标缓冲区,并确保它是锁页内存
cpu_result_buffer = torch.empty_like(cpu_tensor, pin_memory=True)

# 2. 使用 .copy_() 将GPU张量的数据拷贝到这个预分配的缓冲区中
#    non_blocking=True 确保了这是异步DMA传输
cpu_result_buffer.copy_(gpu_tensor, non_blocking=True)

# 3. 如果需要立即在CPU上使用这些数据,必须同步等待传输完成
torch.cuda.synchronize()
基于我实际遇到的情况(较大的激活内存(B,S,D),多层分次传输 layer=30),给出以下测试代码:
import torch
import time
from contextlib import contextmanager
import numpy as np

@contextmanager
def timer(name):
    start = time.perf_counter()
    yield
    end = time.perf_counter()
    print(f"{name}: {(end - start) * 1000:.2f} ms")

def test_memory_transfer_performance():
    # 测试参数
    B, S, D = 1, 16800, 1536
    num_layers = 30
    device = torch.device("cuda")

    print("\n=== 测试配置 ===")
    print(f"Tensor shape: ({B}, {S}, {D})")
    print(f"Number of layers: {num_layers}")
    print(f"单个tensor大小: {B * S * D * 2 / (1024**2):.2f} MB")  # float16是2字节
    print(f"总数据大小: {B * S * D * 2 * num_layers * 2 / (1024**2):.2f} MB")  # *2是因为每层有两个hidden state

    # 初始化测试数据
    test_cases = {
        "原始方案 (直接CPU转换)": {
            "store": lambda x: x.cpu(),
            "get": lambda x, dev: x.to(dev)
        },
        "使用pin_memory": {
            "store": lambda x: x.cpu().pin_memory(),
            "get": lambda x, dev: x.to(dev, non_blocking=True)
        },
        "预分配pin_memory": {
            "store": None,  # 将在测试中设置
            "get": None    # 将在测试中设置
        }
    }

    # 为预分配方案创建pinned buffers
    pinned_buffers = [torch.empty((B, S, D), dtype=torch.float16, pin_memory=True, device='cpu')
                     for _ in range(num_layers * 2)]

    def store_to_pinned(x, idx):
        pinned_buffers[idx].copy_(x, non_blocking=True)
        return pinned_buffers[idx]

    def get_from_pinned(x, dev):
        return x.to(dev, non_blocking=True)

    test_cases["预分配pin_memory"]["store"] = store_to_pinned
    test_cases["预分配pin_memory"]["get"] = get_from_pinned

    # 运行测试
    for case_name, operations in test_cases.items():
        print(f"\n=== 测试场景: {case_name} ===")

        # 准备GPU数据
        gpu_tensors = [torch.randn((B, S, D), dtype=torch.float16, device=device)
                      for _ in range(num_layers * 2)]
        stored_tensors = []

        # 测试存储操作
        torch.cuda.synchronize()
        with timer("存储30层数据到CPU (total)"):
            store_times = []
            for i, tensor in enumerate(gpu_tensors):
                start = time.perf_counter()
                if case_name == "预分配pin_memory":
                    stored = operations["store"](tensor, i)
                else:
                    stored = operations["store"](tensor)
                torch.cuda.synchronize()
                end = time.perf_counter()
                store_times.append((end - start) * 1000)  # 转换为毫秒
                stored_tensors.append(stored)

        print(f"平均每层存储时间: {np.mean(store_times):.2f} ms")
        print(f"存储时间标准差: {np.std(store_times):.2f} ms")

        # 测试获取操作
        torch.cuda.synchronize()
        with timer("从CPU加载30层数据到GPU (total)"):
            get_times = []
            for tensor in stored_tensors:
                start = time.perf_counter()
                retrieved = operations["get"](tensor, device)
                torch.cuda.synchronize()
                end = time.perf_counter()
                get_times.append((end - start) * 1000)  # 转换为毫秒

        print(f"平均每层加载时间: {np.mean(get_times):.2f} ms")
        print(f"加载时间标准差: {np.std(get_times):.2f} ms")

        # 测试批量操作性能
        torch.cuda.synchronize()
        with timer("批量存储30层数据 (total)"):
            if case_name == "预分配pin_memory":
                for i, tensor in enumerate(gpu_tensors):
                    operations["store"](tensor, i)
            else:
                stored_tensors = [operations["store"](tensor) for tensor in gpu_tensors]
            torch.cuda.synchronize()

        torch.cuda.synchronize()
        with timer("批量加载30层数据 (total)"):
            retrieved_tensors = [operations["get"](tensor, device) for tensor in stored_tensors]
            torch.cuda.synchronize()

        # 清理内存
        del gpu_tensors
        del stored_tensors
        del retrieved_tensors
        torch.cuda.empty_cache()

if __name__ == "__main__":
    test_memory_transfer_performance()
运行结果如下:
=== 测试配置 ===
Tensor shape: (1, 16800, 1536)
Number of layers: 30
单个tensor大小: 49.22 MB
总数据大小: 2953.12 MB

=== 测试场景: 原始方案 (直接CPU转换) ===
存储30层数据到CPU (total): 1595.62 ms
平均每层存储时间: 26.59 ms
存储时间标准差: 0.99 ms
从CPU加载30层数据到GPU (total): 314.35 ms
平均每层加载时间: 5.24 ms
加载时间标准差: 0.08 ms
批量存储30层数据 (total): 1647.75 ms
批量加载30层数据 (total): 336.63 ms

=== 测试场景: 使用pin_memory ===
存储30层数据到CPU (total): 3327.30 ms
平均每层存储时间: 55.45 ms
存储时间标准差: 0.79 ms
从CPU加载30层数据到GPU (total): 121.00 ms
平均每层加载时间: 2.02 ms
加载时间标准差: 0.05 ms
批量存储30层数据 (total): 3338.16 ms
批量加载30层数据 (total): 118.92 ms

=== 测试场景: 预分配pin_memory ===
存储30层数据到CPU (total): 137.88 ms
平均每层存储时间: 2.30 ms
存储时间标准差: 0.14 ms
从CPU加载30层数据到GPU (total): 116.48 ms
平均每层加载时间: 1.94 ms
批量加载无明显优势,.cpu().pin_memory()则是最糟糕的情况,属于是走过头了再折返回来白忙活,预分配pin_memory后从cuda直接copy到pin memory则有比较好的效果,当然,预分配的开销没有算进去,但是只要传输次数多,这个开销是可以接受的。
双流流水线:访存计算重叠优化
现在我们来到最后一站,在offload场景中,往往被存储的数据都是与当前计算没有直接关系的数据,这种无依赖性使得我们可以通过访存计算overlap来隐藏访存的开销。我们首先看理论可行性:
- 数据依赖:无。一般是目前用不上的数据才会被offload,因此可以进行提前或滞后的存取。需要注意的是在实际实现中要确保: 1) 读取时序:要确保在真正需要数据时,prefetch已经完成 2) 写回时序:确保数据在写回前已经完成所有修改。
- 硬件冲突:基本上无。kernel计算由SM执行,数据传输由DMA引擎执行。但PCIe带宽和内存带宽是共享资源,存在着一定的控制影响。
因此我们可以借助CPU流水线设计的思想,将访存和计算操作重叠起来。我们的目标是将串行的 [传输 -> 计算 -> 传回] 过程,改造为并行的流水线。想象一个双车道的工厂流水线:
- 单流(串行):一辆车必须走完所有工序(送料、组装、喷漆),下一辆车才能开始。
- 多流(并行流水线):
- 车1进入组装工位。
- 同时,车2可以进入送料工位。
- 当车1完成组装进入喷漆工位时,车2可以进入组装工位,同时车3可以进入送料工位。
通过这种方式,送料(H2D)、组装(计算)和运走(D2H)这些由不同硬件(DMA引擎和SM)负责的工作就可以同时进行了。
我们将使用两个CUDA流(stream1, stream2)来模拟这个过程,交替处理数据块,比如我们可以以模型层数作为stage实现流水线。
- 第1层数据:在 stream1 上执行 H2D -> Compute -> D2H。
- 第2层数据:在 stream2 上执行 H2D -> Compute -> D2H。
- 第3层数据:在 stream1 上执行 …
当GPU在stream1上为第1层数据执行计算时,DMA引擎可以利用空闲时间,在stream2上为第2层数据执行H2D传输。这就是重叠发生的地方,形如:
时间轴:
   Stream1: [H2D1][Compute1][D2H1][H2D3][Compute3][D2H3]
   Stream2:      [H2D2][Compute2][D2H2][H2D4][Compute4]
实现以上设计的必要条件是:
- 锁页内存(Pinned Memory):异步内存传输(non_blocking=True)必须使用锁页内存才能真正实现异步。
- 异步操作:所有的数据传输和核函数启动都必须是异步的。在PyTorch中:
- tensor.to(device, non_blocking=True)
- pinned_buffer.copy_(gpu_tensor, non_blocking=True)
- 在流上下文中启动的计算核函数本身就是异步的。
- 非默认CUDA流:使用 torch.cuda.Stream() 创建多个非默认流来调度任务。
理论可行,实践开始,下面给出测试代码:
import torch
import time
from contextlib import contextmanager
import numpy as np

# timer上下文管理器
@contextmanager
def timer(name):
    torch.cuda.synchronize() # 确保开始计时前GPU空闲
    start = time.perf_counter()
    yield
    torch.cuda.synchronize() # 确保结束计时前所有工作已完成
    end = time.perf_counter()
    print(f"{name}: {(end - start) * 1000:.2f} ms")

def test_overlap_performance(num_layers=30, compute_intensity=10):
    # --- 1. 初始化 ---
    B, S, D = 1, 16800, 1536
    device = torch.device("cuda")
    tensor_size_mb = B * S * D * 2 / (1024**2)

    print("\n" + "="*20 + " 测试计算与通信重叠 " + "="*20)
    print(f"Tensor shape: ({B}, {S}, {D}), Size: {tensor_size_mb:.2f} MB")
    print(f"Layers: {num_layers}, Compute Intensity: {compute_intensity}")

    # 准备数据缓冲区 (必须是锁页内存)
    # H2D源
    cpu_sources = [torch.randn((B, S, D), dtype=torch.float16, pin_memory=True) for _ in range(num_layers)]
    # D2H目标
    cpu_dests = [torch.empty((B, S, D), dtype=torch.float16, pin_memory=True) for _ in range(num_layers)]
    # GPU工作区
    gpu_tensors = [torch.empty((B, S, D), dtype=torch.float16, device=device) for _ in range(num_layers)]

    # 模拟计算的函数
    def do_compute(tensor):
        for _ in range(compute_intensity):
            tensor.mul_(1.001)

    # --- 2. 场景一: 单流顺序执行 (无重叠) ---
    with timer("总耗时 (单流顺序执行)"):
        # 所有操作都在默认流上,会严格按顺序执行
        for i in range(num_layers):
            # H2D
            gpu_tensors[i].copy_(cpu_sources[i], non_blocking=True)
            # Compute
            do_compute(gpu_tensors[i])
            # D2H
            cpu_dests[i].copy_(gpu_tensors[i], non_blocking=True)

    # 测量基准时间 (单独测量各项操作耗时)
    # H2D
    start_event = torch.cuda.Event(enable_timing=True)
    end_event = torch.cuda.Event(enable_timing=True)
    start_event.record()
    for i in range(num_layers):
        gpu_tensors[i].copy_(cpu_sources[i], non_blocking=True)
    end_event.record()
    torch.cuda.synchronize()
    h2d_time_total = start_event.elapsed_time(end_event)

    # Compute
    start_event.record()
    for i in range(num_layers):
        do_compute(gpu_tensors[i])
    end_event.record()
    torch.cuda.synchronize()
    compute_time_total = start_event.elapsed_time(end_event)

    # D2H
    start_event.record()
    for i in range(num_layers):
        cpu_dests[i].copy_(gpu_tensors[i], non_blocking=True)
    end_event.record()
    torch.cuda.synchronize()
    d2h_time_total = start_event.elapsed_time(end_event)

    theoretical_total_time = h2d_time_total + compute_time_total + d2h_time_total
    print(f"  - 单项任务累加理论总耗时: {theoretical_total_time:.2f} ms")
    print(f"    (H2D: {h2d_time_total:.2f} ms, Compute: {compute_time_total:.2f} ms, D2H: {d2h_time_total:.2f} ms)")


    # --- 3. 场景二: 双流流水线执行 (有重叠) ---
    s1 = torch.cuda.Stream()
    s2 = torch.cuda.Stream()
    streams = [s1, s2]

    with timer("总耗时 (双流流水线执行)"):
        for i in range(num_layers):
            stream = streams[i % 2]
            with torch.cuda.stream(stream):
                # H2D
                gpu_tensors[i].copy_(cpu_sources[i], non_blocking=True)
                # Compute
                do_compute(gpu_tensors[i])
                # D2H
                cpu_dests[i].copy_(gpu_tensors[i], non_blocking=True)

    # 清理内存
    del cpu_sources, cpu_dests, gpu_tensors
    torch.cuda.empty_cache()

if __name__ == "__main__":
    # test_memory_transfer_performance()

    # 运行新的重叠性能测试
    test_overlap_performance(num_layers=30, compute_intensity=20)
执行结果如下:
==================== 测试计算与通信重叠 ====================
Tensor shape: (1, 16800, 1536), Size: 49.22 MB
Layers: 30, Compute Intensity: 20
总耗时 (单流顺序执行): 178.03 ms
  - 单项任务累加理论总耗时: 159.46 ms
    (H2D: 58.15 ms, Compute: 38.83 ms, D2H: 62.47 ms)
总耗时 (双流流水线执行): 90.52 ms
Profile结果如下:

